Data Flow in SwiftUI
When Apple introduced SwiftUI in WWDC 2019, they took care how to onboard developers with the new technology in their ecosystem. One of the important topics was how the data flows in the SwiftUI app, because it’s very different from a traditional UIKit app. The main difference you ask?
- being declarative.
The framework
SwiftUI is the shortest path to a great app […]
Luca Bernardi @ WWDC19’
Yes, SwiftUI is an Apple’s declaritive approach syntax framework for building apps for iOS, tvOS, macOS and watchOS. I won’t go into the details about the framework, how it’s built etc. so, if you want to read more about the framework itself go here.
short example of a declaritive syntax SwiftUI view:
struct Person {
    let avatar: String
    var name: String
    var surname: String
    var isFavourite: Bool
}

struct PersonView: View {
    @State var person: Person

    var body: some View {
        HStack {
            Image(person.avatar)
            VStack(alignment: .leading) {
                Text(person.name)
                Text(person.surname)
                    .foregroundStyle(.secondary)
            }
        }
    }
}
Looks pretty easy and fast to build a PersonView that has a model connected to it, without a ViewController, constraints for autolayout (or using a storyboard - I assume you don’t use it ;) ), viewDidLoad, custom passing a model to it and etc.
Data flow
Let’s start with some basics about how the data is passed around in a SwiftUI view. One of the most important things is that the View should have single source of truth. Avoid duplication of view’s state.
Quick cheat sheet
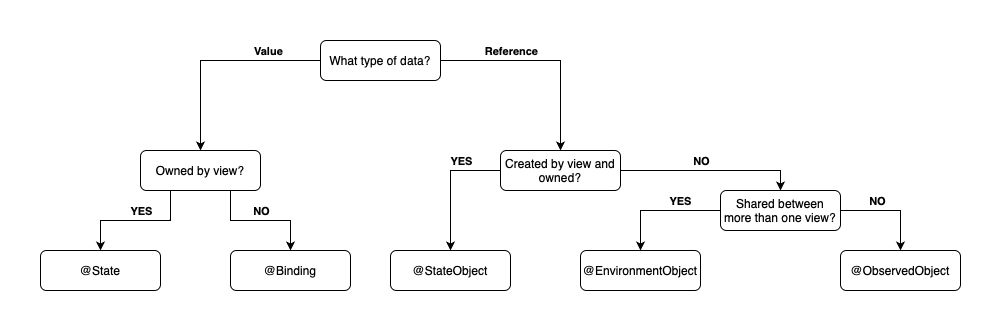
@State
SwiftUI uses property wrappers, to augment the property behaviour when it’s read or written to. First of them is a local state of view:
@State private var name: String = "James"
@State private var age: Int = 42
Every time, the @State property changes, it notifies the view that is owning this source of truth and re-renders the view with the new data. It stores the value, tracks it and makes a dependency towards a view, so the framework knows when it changed and to what value, so it can trigger a view to re-build itself. The data is persisted between the view render passes.
Hint: it’s a good practise to mark the
@Stateas aprivateproperty to enforce that the data is owned and managed by the view where it was created.
@StateObject
The @StateObject was introduced in WWDC 2020, to have an easy way to have a local state of view, but for a reference type. This is very analagic to the @State property wrapper. It makes the referenced object alive between render passes of the SwiftUI view, so it’s not deallocated when the view is re-rendered and the data of the state is persisted. The object that is referenced by @StateObject needs only to be implementing the protocol of ObservableObject. Let’s see a quick example:
@MainActor
class PersonAvatar: ObservableObject {
    @Published var image: UIImage = UIImage(named: "placeholder") ?? UIImage()
    private let path: String = "https://images.pexels.com/photos/774909/pexels-photo-774909.jpeg?auto=compress&cs=tinysrgb&w=1260&h=750&dpr=2"

    func fetchAvatar() async {
        let url = URL(string: path)!
        let urlRequest = URLRequest(url: url)
        let (data, _) = try! await URLSession.shared.data(for: urlRequest)
        self.image = UIImage(data: data)!
    }
}

struct AvatarView: View {
    @StateObject private var avatar = PersonAvatar()

    var body: some View {
        VStack {
            Image(uiImage: avatar.image)
        }
        .task {
            await avatar.fetchAvatar()
        }
    }
}
On the first run, the SwiftUI view will get rendered with image of a placeholder file and done. When the view is built, the asynchronous task starts and run in the background. When the task finishes it updates the @Published var image: UIImage with a jsut downloaded image and the SwiftUI view gets informed about the change through the publisher. Second render pass is being made with the same PersonAvatar object without instantiating a new one. Quite smart huh? Let’s move on.
Hint: The
@StateObjectdefined in the view is it’s source of truth, please remember to not duplicate the same object in your view hierarchy in order to avoid multiple sources of truth.
@Binding
When we have a situation in which the source of truth is not owned by the view, we can use @Binding property wrapper.
We got the PersonView SwiftUI view example above. If we would like to have a subview where we can edit the name, surname or a favorite contact we should use @Binding property wrapper to update that model. Let’s see an example:
struct EditPersonDetailsView: View {
    @Binding var person: Person

    var body: some View {
        VStack(alignment: .leading) {
            TextField("Name", text: $person.name)
            TextField("Surname", text: $person.surname)

            Button {
                person.isFavourite.toggle()
            } label: {
                Text("Favourite: \(person.isFavourite ? "yes" : "no")")
            }
        }
    }
}
As you can see above, the SwiftUI view is able to modify the data model of a person, but it’s not owning it. There’s no initialization of the property, because it’s expected to be injected into the EditPersonDetailsView at view initialization phase. The TextFields will modify the name name surname and the button will update the boolean of the isFavourite. Assuming, that the EditPersonDetailsView was presented as a modal for example, when we will close it the Person data in the PersonView will be updated automatically for you. That’s the @Binding magic. It creates a two directional way of read/write the data from the model passed between two views.
@ObservedObject
This property wrapper @ObservedObject can be used to observe (as the name suggests) an object that was created somewhere else in the view hierarchy or even outside and our view listens for changes or can introduce some changes into it. The main difference of ObservedObject and @StateObject is that the view doesn’t own the data/state when using the @ObservedObject property.
An example with a person model using reference type and a variant of the person’s detail view:
class PersonModel: ObservableObject {
    @Published var avatar: String
    @Published var name: String
    @Published var surname: String

    init(avatar: String, name: String, surname: String) {
        self.avatar = avatar
        self.name = name
        self.surname = surname
    }
}

struct PersonDetailViewObservedObject: View {
    @ObservedObject var person: PersonModel

    var body: some View {
        HStack {
            Image(person.avatar)
            VStack(alignment: .leading) {
                Text(person.name)
                Text(person.surname)
                    .foregroundStyle(.secondary)
            }
        }
    }
}
Initializing the view somewhere in the view hierarchy requires passing the model into it:
let personModel: PersonModel = PersonModel(avatar: "avatar.png", name: "James", surname: "Bond")
// ...
PersonDetailViewObservedObject(person: personModel)
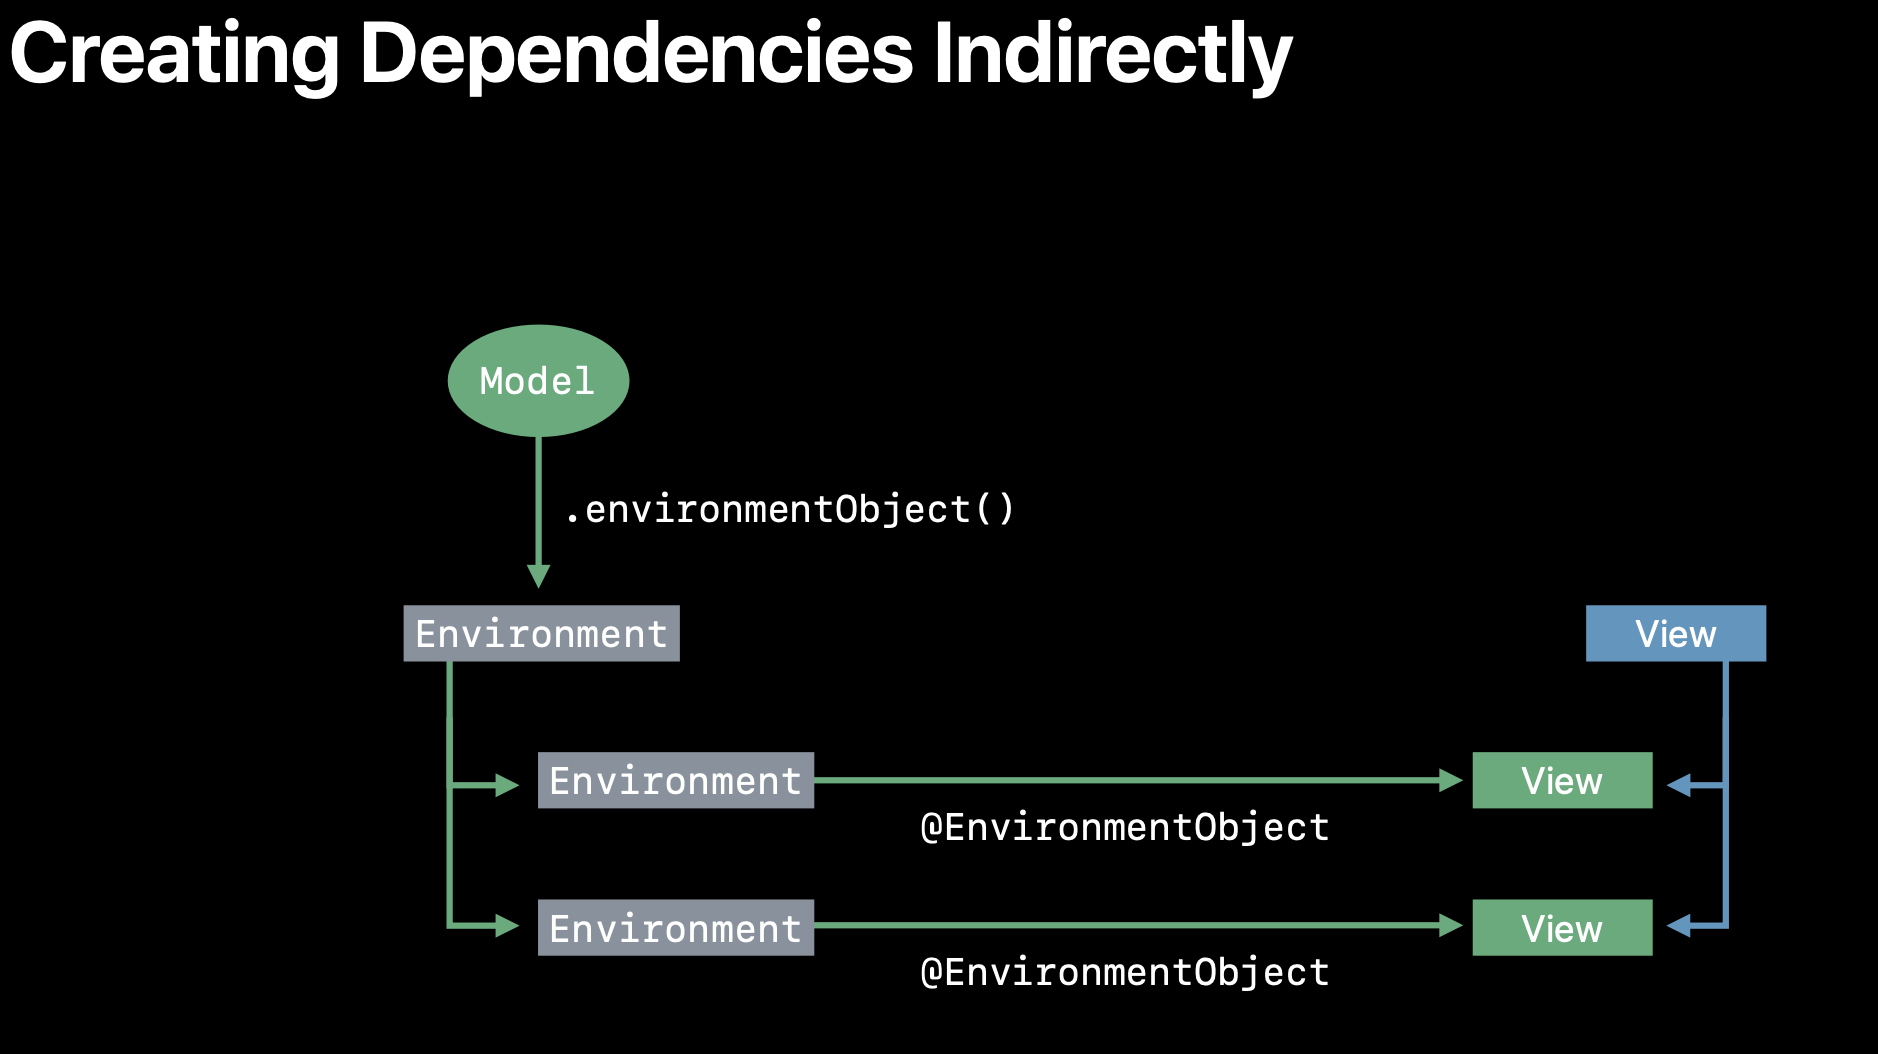
@EnvironmentObject
This property wrapper is used, when we have some model of data that can or should be shared across many views within the view hierarchy. When injected on the high level of the view hierarchy, views that are lower in the hierarchy can easily access the shared passed model by simply using:
@EnvironmentObject private var userAuth: UserAuth
in the view that needs to access it. It’s just ‘that’ simple.
Here’s a nice visual explanation of the environment from the WWDC19’ by Raj Ramamurthy:

ok, now let’s see an example code below:
class UserAuth: ObservableObject {
    @Published var isUserLoggedIn: Bool = false

    func login() {
        // some auth code
        //...
        isUserLoggedIn = true
    }

    func logout() {
        // drop auth keys
        isUserLoggedIn = false
    }
}

struct PersonDetailViewEnv: View {
    @Binding var person: Person
    @EnvironmentObject private var userAuth: UserAuth

    private func openLogin() {
        // proceed to login screen
    }

    var body: some View {
        HStack {
            if userAuth.isUserLoggedIn {
                Image(person.avatar)
                VStack(alignment: .leading) {
                    Text(person.name)
                    Text(person.surname)
                        .foregroundStyle(.secondary)
                }
            } else {
                Text("You have to log in.")
                Button {
                    openLogin()
                } label: {
                    Text("login")
                }

            }
        }
    }
}
What happens here is that, there is some UserAuth living in the app, that has an information about whether the user is logged in or not. It makes use of @Published property wrapper to notify all of the listening views for the state changes.
User authentication is something that should be shared in the app from the very first view in the app, so let’s put it in the MainView:
@main
struct PersonApp: App {
    let userAuth = UserAuth()

    var body: some Scene {
        WindowGroup {
            MainView()
                .environmentObject(userAuth)
        }
    }
}
Let’s assume that in this case, the MainView view is containing the PersonDetailViewEnv view, so the PersonDetailViewEnv doesn’t need to be invoked with .environmentObject(userAuth) because it’s already in the same chain of the view hierarchy, so the environment object is alread in place, just the PersonDetailViewEnv needs to access it by:
@EnvironmentObject private var userAuth: UserAuth
And voila! That’s how passing the data through the @EnvironmentObject works.